Pages

Monday, 30 May 2011

Weight Watchers Banana Bread

Let us call a cake a cake. Banana 'bread' is cake. It is unashamedly cake. It's not even straddling the fence between cake and bread like say Brioche or Stollen. It is a cake. Someone suggested that perhaps it's called bread because it is baked in a loaf tin. But the problem with that argument is that so many other cakes are baked in loaf tins. Most of the pound cake family is baked in loaf tins and we don't go round calling them bread willy nilly.


You might be wondering why I'm so hung up on whether it is called banana 'bread' or 'cake'. What's in a name eh? I'll tell you. You call something 'bread' and in my opinion, that means it is fine to eat several slices of it for breakfast. I mean, I've only just come to accept that despite the fact that muffins are called 'muffins' instead of 'cake', there ain't no hiding the fact that they're fatty cake fully of chocolate chips and toffee and banana and all sorts of other calorific goodness naughty stuff and hence, I should avoid them for breakfast. 


Which is why I love this recipe. While it is called a bread, it is actually a cake. It doesn't taste diet-y even though it only contains about half the butter and sugar of this other recipe, it is easy to make and a great way to get rid of very ripe old bananas and best of all, I can eat a slice or two for breakfast!


Recipe adapted from Weight Watchers UK


Propoints per slice - 5
Makes 12 slices


Ingredients
5 sprays cooking spray, calorie controlled
200g self raising flour
1/4 tsp bicarbonate of soda
75g butter, softened
75g dark brown sugar
1 level tablespoon honey
2 eggs, beaten
2 medium ripe bananas, mashed
100g sultanas
1 tsp vanilla


 - Spray a 450g loaf tin with cooking spray. Preheat the oven to Gas Mark 4/180C/350F
 - Combine the flour and bicarbonate of soda
 - Cream the butter for 2-3 minutes until light and fluffy. Add the sugar and beat for another 2 minutes. 
Add the honey and beat for 1 more minute 
 - Add the eggs and vanilla and beat for 2 more minutes
 - Fold in the flour until combined. (Do not beat)
 - Fold in the mashed bananas and sultanas. 
 - Spoon into the tin
Bake for 45 minutes - 1 hour until a skewer inserted comes out clean. (Check after 45 minutes and using your judgment, every 5 or 10 minutes thereafter)
 - Turn out and cool on a rack
Note
Very ripe bananas are best for all banana breads as they have a natural sweetness and mash easily


Monday, 23 May 2011

Cake Pops!!!

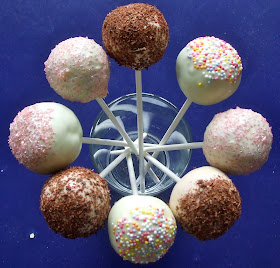
The overwhelming response when I told people I was making cake pops was "What are cake pops?"Well my dears, in case you're asking yourselves the same question, cake pops are cake balls on a stick. Kinda like lollipops but with cake. Got it? I'd heard about and seen pictures of cake pops and would have gotten round to making them sooner or later but well, fate decided it was sooner when my friend Doyin asked me to make them for her friend's one year old's birthday party.


Now cake pops are very pretty, and pretty straight forward to make - a lot of people make them with boxed cake mixes and ready made icing - but man are they time consuming! It's more the final stage that is a bit of a pain in the butt - dipping the cake balls into your melted chocolate and decorating them. For the decoration and chocolate not to drip, you have to hold each ball upside down for a couple of minutes till the chocolate sets a tiny bit more - pain in the butt I tell ya!


Despite not tasting any of these, I have it on good authority that they were amazing so go on, give 'em a go. Especially if you have kids. I think they'll love the idea of cake on lollipop sticks. Though it might leave them on a sugar high like never before ... ummm, sorry about that in advance but I blog about food not children, you really shouldn't have listened to me ;p


Ingredients


For the Cake - Adapted from  (From Joy of Baking)
2 1/2 cups / 250g sifted cake flour
1/2 teaspoon salt
2 tablespoons / 15g cocoa powder
1/2 cup / 113g unsalted butter, at room temperature
250g granulated white sugar
2 large eggs
2 teaspoons vanilla extract
1 cup / 240ml buttermilk
2 tablespoons liquid red food colouring
1 teaspoon white distilled vinegar
1 teaspoon baking soda


For the frosting
100g unsalted butter, at room temperature
1 cup icing sugar
1 tsp vanilla extract


For the covering and decoration
400g white chocolate
2 teaspoons vegetable oil
Whatever sprinkles you want to use


lollipop sticks
a couple of blocks of florist foam


Makes about 30 cake pops


1 - Preheat oven to 175C / 350F and place rack in center of oven. Butter and flour a 12 inch round cake tin. Set aside.
2 - In a mixing bowl, combine the flour, salt, and cocoa powder. Set aside
3 - In the bowl of your electric mixer, or with a hand mixer, beat the butter until soft (about 1-2 minutes). Add the sugar and beat until light and fluffy (about 2-3 minutes)
4 - Add the eggs, one at a time, beating well after each addition. Scrape down the sides of the bowl. Add the vanilla extract and beat until combined
5 - In a measuring cup, whisk the buttermilk with the red food colouring.
6 - With the mixer on low speed, alternately add the flour mixture and the buttermilk to the butter mixture, in three additions, beginning and ending with the flour until all just combined
7 - In a small cup combine the vinegar and baking soda. Allow the mixture to fizz and then quickly fold into the cake batter.
8 - Pour batter into your cake tin and bake in the preheated oven for approximately 25-30 minutes, or until a toothpick inserted in the center of the cakes comes out clean
9 - Cool cake for a couple of hours or overnight
10 - For the frosting, whisk softened butter for 2 minutes. Add vanilla and icing sugar and whisk together until  you have a creamy frosting (about 5 minutes). I use my electric mixer. It would take longer by hand.


For the cake pops (Note that you can ignore the first part of this recipe and buy a cake mix and some ready made frosting)
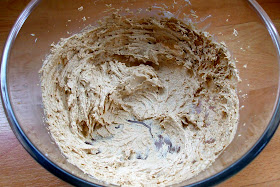
11 - Break cake into a bowl and adding about half the frosting and smush it all together with your fingers. 

Keep adding frosting and smushing (isn't this such a wonderful non-word?!) until the mixture binds to itself and not to the bowl. I used all the frosting but you might not (especially if you are not using my frosting recipe).
12 - Line a baking sheet with grease-proof paper
13 - Shape mixture into round balls and place on your baking sheet. I used a tablespoon of mixture per ball to get the size I wanted and also get evenly sized balls
14 - When you have finished shaping your balls, put them in the fridge for 30 minutes
15 - After 30 minutes, melt about 50g of the white chocolate in a bain marie (leaving the chocolate bowl in the hot simmering water). Take out your cake balls from the fridge and your lollipop sticks
16 - Dip the lollipop sticks in the melted chocolate and insert into the cake balls, going more than halfway through
17 - Repeat for all the cake balls and put them back into the fridge for about an hour
18 - Melt the remaining chocolate with the 2tsps of oil (Again leaving the bowl on the simmering water as the next part can take a while and you don't want your chocolate to solidify)
Taking each cake ball on stick, dip into the chocolate until covered, then swirl round gently until chocolate stops dripping
19 - I did this next part over the sink as it can be messy, hold the cake ball over the sink and gently sprinkle sprinkles (or whatever decorations you are using) in whatever pattern you want and then I recommend holding it upside down for a couple of minutes before sticking it in the florist foam (stick side down!) as when I didn't, the chocolate and sprinkles dripped a bit onto the foam slightly misshaping my cake pops.

20 - Repeat until your foam is full of decorated cake pops and put in the fridge for about half an hour for the chocolate to set


Voila! The prettiest things you would have made in a very long time!

Sunday, 15 May 2011

My Wonky Black Forest Gâteau

Hey! Hey! Sorry I've been rather, umm, delayed, on the posting front. I wish I had a good excuse I have great excuses; I've been lazy and busy and I've been on holiday! Whoop whoop! I went to LA and San Francisco and Atlanta. It was my first time visiting the West Coast of the US so I was very excited! Plus I got to see a couple of lovely friends get married. Have I mentioned that I love weddings? Well, if I haven't, I'm mentioning it now; I love weddings! 


You probably know me well enough by now to know that I love eating when I'm on holiday. Especially in the US. And this trip was no exception. Some new things I tried were Love at first Bite cupcakes in Berkeley, California (AMAZING! One of the only times that I've found cupcakes to live up to their looks and description), In 'n' Out Burger (I'm not much of a burger person but these were incredible. Their milkshakes are great too. Plus they're a Christian company!) and Crumbs cupcakes (HUGE and great looking with lots of wonderful sounding flavour combinations but rather underwhelming). And some old favourites I just had to have; Cheesecake Factory (I had the Reese's peanut butter cheesecake and it was scrumptious. I'm going to find a similar recipe because I need it in my life!) and Five Guys burger (as good as the first time I had it!). Something else I discovered were peanut butter M&Ms. Wow! Why has nobody ever told me how amazing they are???


Anyway, before I get too carried away, back to today's post. I made this for a friend of mine who had been harassing me ever since he found out I baked to make him a Black Forest Gâteau. Now I have to say, I'm not the biggest fan of this cake. Mainly because the only way I like my cherries is fresh and washed. But after a lot of hassling, I found this recipe and gave it a go. My cake was pretty tall and it ended up rather wonky when I put it together. All in all, I wasn't too impressed with it when I had a slice later. It was rather dry, despite soaking the sponge layers in the black cherry syrup, and it just wasn't as tasty as other cakes I've had. And I've had a lot! However, if you still want to give it a go - here's the recipe. It is by Antony Worrall Thompson from the BBC Food website.


Ingredients


For the chocolate cake
340g/12oz golden caster sugar
340g/12oz unsalted butter
6 eggs
240g/8.5oz self raising flour
100g/3.5oz cocoa


For the filling
2 cans black cherries in syrup
2 tbsp kirsch


For the icing
600ml/21 fl oz double cream
200g/7oz good quality dark chocolate, broken into small pieces


To decorate
50g/2oz dark chocolate, for shaving


1 - Preheat oven to 170c/325F/Gas Mark 3
2 - Lightly butter a 20cm (8in) loose-bottomed cake tin then dust with a little plain flour and shake off any excess. Line the tin with greaseproof paper
3 - For the cake, place butter and sugar in a bowl and whisk until light and fluffy. 
Beat in the eggs one at a time 
Then fold in the flour and the cocoa powder
4 - Spoon the mixture into the prepared cake tin, smooth the surface with a knife and bake in the pre-heated oven for 35-40 minutes until firm and springy. 
To test if the cake is done, insert a clean skewer into the middle of the cake - if it comes out clean then the cake is ready
5 - Remove from the oven and leave to cool in the tin for five minutes before turning out onto a wire rack
6 - Drain the cherries, reserving 200ml (7 fl oz) of the cherry syrup. Add the kirsch to the reserved syrup
7 - Use a large serrated knife to slice the cake horizontally into three equally sized rounds
8 - Place each round on a chopping board and spoon the cherry syrup evenly over each disc and leave to soak in
9 - For the icing, heat 200ml (7 fl oz) of the double cream to scalding point then add the chocolate pieces. Remove from the heat and stir gently until the chocolate is melted and smooth. Pour into a bowl and allow to cool in the refrigerator, to thicken slightly
10 - Whip the remaining double cream until thick. Spread one of the cake discs with half of the cream then cover with half of the cherries, pressing them in lightly.


Top with the second disc of sponge and repeat this process, finishing with the third disc left plain on top. Gently press the whole cake together with the palm of your hands
11 - Remove the chocolate icing from the fridge and give it a quick stir. Use a palette knife to thickly spread the top and sides of the cake with the icing, starting with the top first. This way, if the chocolate oozes down the sides of the cake, it won't matter.
12 - Garnish with chocolate shavings. I pressed them into the sides of the cake
13 - Leave the cake to set in a cool place then slice into large wedges and serve